
Using Tapcons & Hammer Drive Anchors to Install Conduit
Published by Robert Carlisle on Feb 27th 2010
Purchase Hammer Drive Anchors
Purchase Tapcon Anchors
When fastening a conduit strap to a concrete, brick or block wall- it is necessary to use a concrete anchor or fastener to ensure a safe installation. The most commonly used fasteners for this application are Tapcon® concrete screws and hammer drive anchors. Although any type of concrete anchor can be utilized for this purpose, these two fasteners are typically chosen due to their ease of installation. It is also important to understand the many uses of conduit before installing any electrical equipment.
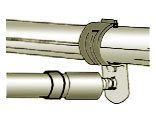
Conduit is a rugged, protective pipe or tube that is used to house and protect electrical wiring. When conduit needs to be attached to a wall, conduit straps (or clamps) are typically installed around the conduit itself to support the conduit and fasten it securely to the wall. The spacing of the straps is determined by the type of conduits such as rigid steel, EMT or PVC. The size/diameter of the conduit will also affect spacing. These requirements can be found in the National Electric Code (NEC). Conduit straps are available in a variety of shapes and sizes to meet the needs of various applications, conduit sizes, required holding values and personal preference. Each conduit strap is designed with one or two holes through which a fastener is inserted, securing the conduit strap to the wall. Many straps also offer some chemical resistance, providing a complete corrosion resistant system.
After you decide on the correct size of conduit and type of conduit strap to use, the installation process can begin. The size of the hole in the strap will determine the diameter of fastener that should be used. In most cases, either a 3/16" or 1/4" diameter fastener will be needed. Tapcons and hammer drive anchors are both available in 3/16" and 1/4" diameters. At this point, the decision must be made on which fastener to use for your particular project.
The major difference between these two fasteners is that Tapcons are removable and hammer drive anchors are permanent fasteners. Removal of hammer drive anchors will cause damage to the surrounding concrete, brick or block.
It is also important to consider the unique characteristics of the project and your specific needs when deciding on the type of fastener to use. The following list of features may also be taken into consideration when choosing your fastener:
Pros & Cons of Tapcons and Hammer Drive Anchors for Fastening Conduit Straps
Tapcons
PROS:
Removable
Can be installed close to an edge
Available in hex and flat head
Available in stainless steel
CONS:
Blue color may detract from visual aestheticsHammer Drive Anchors
PROS:
Permanent
Color may blend nicely with fixture
Anchor size is equal to hole size
Low Profile
Tamper Resistant
Hammer sets the anchor easily
Available in stainless steel
CONS:
Permanent
Not recommended for overhead applications
Installation Instructions
Below are the installation instructions for both the Tapcon® concrete screw and the hammer drive anchor:
Tapcon® Installation
1. Using a hammer drill and correctly sized carbide tipped masonry bit, carefully drill a pilot hole 1/2" deeper than the recommended anchor embedment into the base material.
Tech Tip: 1/4" diameter Tapcon requires a 3/16" bit and a 3/16" diameter Tapcon uses a 5/32" bit.
2. Clear the hole of all debris.
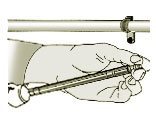
3. Insert the pointed end of the concrete screw through the hole in the conduit strap and into the hole in the base material.
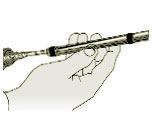
4. Using a standard drill with the appropriate hex or Phillips socket, drive the concrete screw slowly into the pre-drilled hole until the screw is fully seated.
** Be careful not to over-tighten the screw! This will cause the screw to spin in the hole stripping the threads.
Use this same process to install any other conduit straps that are needed in the application.
For more detailed step-by-step information, please view the Concrete Screw Installation Video.
Hammer Drive Anchor Installation
Hammer drive anchors can be used to install conduit straps in four simple steps:
1. Using a hammer drill and correctly sized carbide tipped masonry bit, carefully drill a pilot hole (1/4" deeper than the recommended anchor embedment) into the base material.
Tech Tip: Anchor size is equal to hole size when working with hammer drive anchors.

2. Clear the hole of all debris.
3. Insert the hammer drive anchor through the hole in the conduit strap and into the hole in the base material.
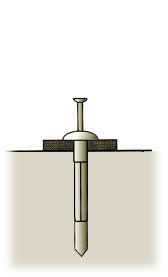
4. Using a hammer, carefully hit the nail into the anchor until the nail head is flush with the top of the anchor.

For more detailed installation instructions, please view this Hammer Drive Installation Video.
When completing any type of electrical project, please refer to the NEC (National Electrical Code) to ensure the safe installation of all electrical wiring and equipment.